Showing posts with label candy. Show all posts

Tuesday, December 8, 2020

Christmas Treats to Give and Eat - Part Two

In these weeks leading up to Christmas, I'm sharing some favorite holiday treats from the Obi house. Treats that are fun to share with your family, BUT will also bring joy to others. And this week we're continuing to keep things simple with Pretzel Turtles.

When I was growing up, Turtles were one of my favorite candies and every Christmas my Dad would buy a box for him, my mom and me to share. Now I can make my own to share with others.

Here's what you'll need:

  • Pretzel Squares (if you can't find the squares, you can use the mini twists)
  • Pecan halves
  • Individually wrapped soft caramels, unwrapped (I use Werther's)
  • Milk chocolate for melting (or dark, if you prefer)
Notice that I didn't give any amounts. That's because you can make as many or few as you like. Just be sure to have equal amounts of pretzels, pecan halves and caramels.

Lightly toast your pecan halves either in a skillet on the stove or it the oven. Roughly 4-6 minutes, just be sure to toss them a time or two and watch them so they don't burn. Once they're toasted, set them aside to cool.

Preheat oven to 325 degrees.

On a baking sheet lined with a silicone mat or parchment paper, lay out your pretzels and top each with a caramel.
Bake 3-5 minutes, until caramel is soft, but not oozing.
Immediately press a pecan half into each melted caramel.
While those are cooling, melt your chocolate. I put mine in a measuring cup then microwaved it in 30 second intervals, stirring between each, until smooth. You can also melt them on the stove top with a double boiler or nonstick pan over low heat.
Once the pecan-topped caramels are cool, remove them from the pan. Spoon a 1 to 1 1/2 teaspoon puddle of melted chocolate onto the silicone/parchment then carefully drop a pecan-topped pretzel into the middle like so.
Continue until all pretzels are nestled in chocolate.

Cool completely before serving.
These really are to-die-for. Dare I say, even better than the originals. They're sweet and salty chocolatey perfection.

For gift giving, simply place several in a festive tin or a cellophane bag tied with a pretty ribbon. Or simply serve them on a pretty plate. Trust me, your loved one(s) won't care once they bite into these delicious treats.

Will you be giving any gifts from your kitchen this year? If so, what's on your list?


Award-winning author Mindy Obenhaus is passionate about touching readers with Biblical truths in an entertaining, and sometimes adventurous, manner. She lives on a ranch in Texas with her husband, two sassy pups, countless cattle, deer and the occasional coyote, mountain lion or snake. When she's not writing, she enjoys spending time with her grandchildren, cooking and watching copious amounts of the Hallmark Channel. Learn more at mindyobenhaus.com

Friday, December 4, 2020

Chocolate-Butterscotch Holiday Treats

 with Missy Tippens

Thought I'd re-share a post from 2016! It's great to make for gifts. One of my favorites. Enjoy again!
****

Missy's Chocolate-Butterscotch Treats

I started with Mindy's recipe for Chocolate Peanut Bliss: click here. But I doctored it up, mainly to make it stretch further.

1 pack vanilla almond bark
1 pack chocolate almond bark
1 pack (4 oz) Baker's German Sweet Baking Bar (I'm convinced this is the secret ingredient making it so yummy)
1 bag semi-sweet chips (12 oz)
1 bag butterscotch chips (12 oz I think)
32 oz. dry roasted peanuts
½ of a large bag Chow mein noodles


Chop the chocolate bark and bar. This was taking me forever, so I just started digging the tip of the knife into the chocolate to break it up in chunks.


Toss all the chocolate and chips into the Crock Pot. I turned it on high to start the warming but then turned it down to low.


While the chocolate melted (stirring occasionally), I gathered the other ingredients along with my silicone baking sheets and parchment paper.


When the chocolate was melted (don't over-cook it!), I used a whisk to smooth it out (some of the chips didn't want to melt really well).

Once smooth, stir in the nuts and noodles. Then spoon onto the paper/silicone mats and let sit until hardened. This step took a couple of hours, so be sure to leave time--especially if you're planning to pack them up as a gift.


These are definitely something kids can help make. I guarantee everyone will love them!


Merry Christmas y'all! I hope you enjoy the time with friends and family. And also remember the Reason for this season. 


www.missytippens.com

Tuesday, December 1, 2020

Christmas Treats to Give and Eat - Part One

Christmastime is finally here! The sights, the sounds, the smells, the treats... Yes, Christmas might look a little different this year, but that doesn't mean we have to forgo all of our traditions. Particularly those that bring joy to others.
I don't know about you, but baking cookies and making candy is all a part of my holiday experience. Not because I love to eat them. Well, I do like to eat them, but the joy is in giving. Preparing a plate of cookies and candies, wrapping it in cellophane and tying it with a pretty bow is such a simple, yet much appreciated, way to let someone know you're thinking of them.

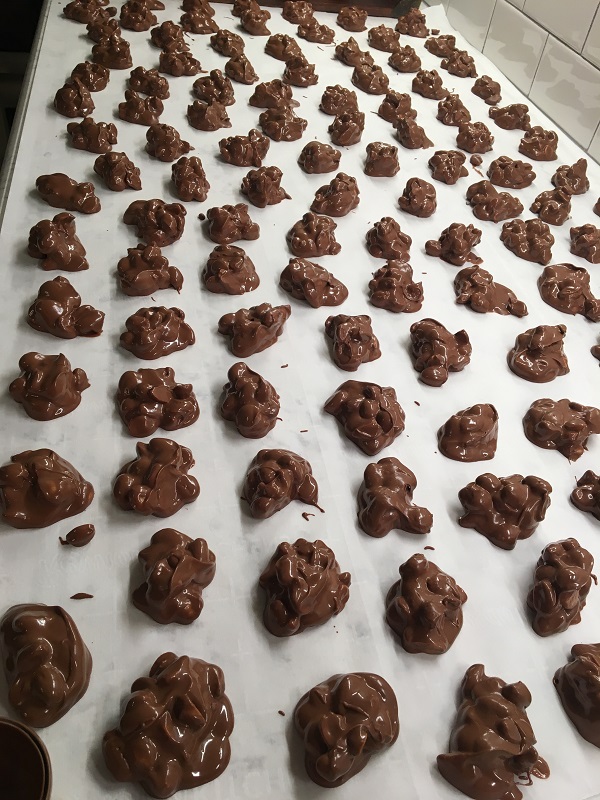
These Peanut Clusters are usually one of the first treats I make. They're so simple that even a non-cook will be met with high praises. All you need is a CrockPot or a large bowl.

Here's what you'll need:
  • 1 pkg vanilla almond bark
  • 1 pkg chocolate almond bark
  • 12 oz pkg semisweet chocolate chips
  • 1 bar Baker's German Chocolate
  • 35 oz container dry roasted peanuts (This is non-negotiable. Other types of peanuts/nuts won't work in this recipe. Something about the oils.)
Chop barks and chocolate and put everything except the peanuts into your crock. BTW, I do not recommend using a liner. I've tried it twice and both times I had to start over. I don't know why, but the chocolate seized.
Cover the CrockPot, turn to low setting and walk away. Seriously. You're free to get back to hauling boxes out of the basement, decorating, reading, whatever. 

After one hour (longer, if you like), stir until smooth. If lumps remain, replace lid and let it go a while longer.

Now, if you don't own a slow cooker, you can melt the chocolate in a large, microwaveable container in the microwave. Start with two to three one-minute intervals, stirring after each minute. Once the chocolate begins to melt, switch to thirty-second intervals until the chocolate is melted.

Regardless of your melting method, once the chocolate mixture is smooth, stir in your peanuts.
Make sure everything is mixed well.

Then, using a spoon or small scoop, drop dollops, as large or small as you like, onto parchment or waxed paper. 
Allow to set completely before transferring to serving tray or airtight container.
One of the best things about these peanut clusters, besides the whole sweet and salty thing, is that they freeze beautifully. That means you can make them now and store them in the freezer until you're ready to gift them. They're also great should you need a special treat for an impromptu holiday get-together or if you're entertaining unexpected guests. Of course, you might also sneak one or two for dessert every now and then.

But let's face it, Christmas is about giving. Giving brings us joy because God gave us the greatest gift of all on that very first Christmas. A baby born in a stable Who would give His life for our sins so we could spend eternity with Him. There is no greater love than that, my friends. 

Award-winning author Mindy Obenhaus is passionate about touching readers with Biblical truths in an entertaining, and sometimes adventurous, manner. She lives on a ranch in Texas with her husband, two sassy pups, countless cattle, deer and the occasional coyote, mountain lion or snake. When she's not writing, she enjoys spending time with her grandchildren, cooking and watching copious amounts of the Hallmark Channel. Learn more at mindyobenhaus.com

Tuesday, December 10, 2019

Christmas Candies

The Christmas season is now in full swing. You know what that means. Time for parties and church/family gatherings. And that means it's candy making time.
All those gatherings are the perfect opportunity to break out those favorite candy recipes you make only during the holidays. Because let's face it, if you make it just to have at home, you're going to be the one eating it all. Well, I would be anyway. I have little restraint this time of year. 

Peanut Clusters are one of the first things I make every year. (recipe here)
They're super easy to make AND they freeze well. That means you can make them now and then simply thaw what you need as you need them. They're perfect for parties and gift-giving.

Another annual treat that freezes well is Peanut Butter Balls. (recipe here)
Also known as Buckeyes, these are reminiscent of Reese's Peanut Butter Cups. You can find the recipe here, however I have made one minor change. Actually, one that makes things so much easier. Instead of melting a bit of paraffin into chocolate chips (very old-school), I simply use the melting wafers or coating chocolate. Both are made to coat and harden into a nice chocolatey shell.

My mom's favorite Fantasy Fudge is next. (Recipe can be found here)

This recipe has adorned the back label of Kraft Marshmallow Cream for as long as I can remember. However there was a slight change somewhere along the way. The recipe has always called for a small can of evaporated milk. But for some reason, the makers of evaporated milk changed the amount in the can from 6 ounces to only 5 ounces. And because of that, my beloved fudge just wasn't the same. It wasn't until I stumbled across the original recipe my mom had cut off of the back of a jar many, many years ago that I discovered the problem. So, don't buy the small can of evaporated milk. Do yourself a favor and get the larger can and measure out a full 6 ounces.
Trust me on this one. That one little ounce of evaporated milk makes all the difference.

Another confectionary treat that's perfect for both young and old is Dipped Pretzel Rods, (Tutorial here)

Their sweet/salty mix makes them a delicious treat. And you can add sprinkles or drizzle them with those colored candy wafers you find by the cake decorating supplies to make them extra festive.

My final favorite chocolatey Christmas treats are Pretzel Turtles. (Recipe here)

Like the Dipped Pretzels, these Pretzel Turtles require no baking skills. All you need to do is assemble. But your patience will be rewarded with a very tasty treat that will wow your friends and family. 

That's my lineup of holiday candies. What are some of your favorite Christmas candies to share?

Three time Carol Award finalist Mindy Obenhaus lives on a ranch in Texas with her husband, the youngest of her five children and two dogs. She passionate about touching readers with Biblical truths in an entertaining, and sometimes adventurous, manner. When she's not writing, she enjoys cooking and spending time with her grandchildren. Learn more a mindyobenhaus.com.

Friday, December 28, 2018

Sweet and Salty Make a Great Marriage

Missy Tippens

I know it's past Christmas and the making of holiday candy. But I still wanted to share what I made as gifts this year because I actually remembered to take photos. :) So maybe keep this in mind for the future!

My hair stylist recently mentioned how simple it was to dip large pretzel rods in chocolate. She had done them for gifts several times and said everyone loved them. So I decided I would try that this year.

I bought 4 packs each of white (vanilla) and chocolate bark (candy coating). Then I melted them in the slow cooker and Instant Pot (on slow cook setting).


I also added one box of Baker's German Chocolate to the chocolate batch.

Then, my daughter and I spent FOREVER dipping them! We also drizzled with the opposite chocolate and sprinkled with red and green sugar.


Once they'd hardened, we packaged them in plastic bags. We actually had a good bit of chocolate left over, so I broke up some pretzels, stirred them into the chocolate, then poured it out and swirled white chocolate on top. I also used some of of the white and topped with cashews and pretzel pieces.


Once these hardened, I broke them up into pieces. Lots of candy left for us to eat! I may try freezing some.

And yes, everyone seemed to enjoy the dipped pretzels! However, the project was very time consuming so I probably won't do it again for gifts. I may do Mindy's pumpkin bread next year.

Hope you all have a wonderful new year! Blessings in 2019!

www.missytippens.com


Tuesday, December 11, 2018

Christmas Candy Traditions - Fantasy Fudge

My mom was not a big baker, but she loved her sweets. As evidenced by her numerous recipe files, where most off of the tabs designating Appetizers, Main Dishes and Side Dishes were empty, while the ones that read Cakes, Pies and Desserts were stuffed full. Granted, she never made most of the recipes, but when the holidays rolled around, there was always one thing Mom was guaranteed to make.
Fudge was, and still is, her absolute favorite Christmas treat. And I couldn't imagine the holidays without it. Yet, as I've shared with you before, I ran into a problem with her Fantasy Fudge recipe several years ago. I made it the same way, but it just wasn't as creamy. It wasn't right. 

Then I stumbled upon the greasy, yellowed recipe she'd cut off of the back of a jar of marshmallow cream all those years ago and, with a little research, I figured out the problem. Now I feel it my duty to reveal the truth to everyone like me who grew up eating Fantasy Fudge, only to be disappointed with the results from the recipe on today's jars of marshmallow cream.
 
You see, back in the day, a small can of evaporated milk contained 6 ounces. Yet somewhere along the way, the manufacturers changed the amount to 5 ounces. And even though it's an ounce smaller, the recipe for Fantasy Fudge on the backs of marshmallow cream jars still call for a small (5 ounce) can of evaporated milk. For people like me who relive memories every time they bite into a piece of fudge, that's just not right. 

So for all of you who grew up celebrating the holidays with Fantasy Fudge, here's the real Fantasy Fudge Recipe we all remember.
  • 3 cups sugar
  • 3/4 cup margarine (I use butter)
  • 6 oz. evaporated milk
  • 1 12 oz bag semi-sweet chocolate chips
  • 1 7 oz jar marshmallow cream
  • 1 cup chopped nuts (optional)
  • 1 teaspoon vanilla extract
First thing you'll want to do is line a 9x13 baking pan with aluminum foil. This is so you can lift the fudge out of the pan after it's cooled, for easier cutting.
Now spray that foil with some non-stick spray and set aside.

Melt your butter or margarine over medium-high heat in a heavy saucepan at least 3 quarts in size.
Once the butter is melted, add your sugar and 6 ounces of evaporated milk. Yes, buy the big can and store the unused portion in a mason jar or other sealed container in the fridge and use it in your next batch of mashed potatoes.
Stir that all together and continue to cook and stir until it comes to a boil.
Once it boils, keep stirring and cook for approximately 5-7 minutes, until mixture reaches soft ball stage on a candy thermometer.

What's that, you don't have a candy thermometer

Not to worry. We didn't have one when I was growing up, so I learned to do it old school.

Drizzle a small amount of the boiling mixture into a cup of cold water.
Now stick your fingers in there and see if you can form the mixture into a soft ball. If not, keep cooking, testing every minute or so.

This is what you should end up with.
Perfect!

And if you pop said soft ball into your mouth, you will be a very happy camper. Just sayin'.

So once your mixture has reached the soft ball stage, remove the pan from the heat and add the chocolate chips.
Stir until melted, then add your marshmallow cream.
This takes a little longer to stir in than the chocolate chips, because you need to make sure all the little lumps are gone and the mixture is nice and smooth.

Once it is smooth, add your vanilla and stir to mix.
And finally, if you're adding nuts (I prefer pecans), now's the time to do that.
Stir those in and your mixture should look like this.
Pour into your prepared pan and set aside to cool for at least a couple of hours. 

Do not refrigerate until completely cooled.
When the fudge is cooled and set, remove foil/fudge from pan and cut into squares.
Sorry, my lighting must have been a bit off, because these look much lighter than they really are. There were still dark, like the previous pic of the pan. Either way, the fudge is creamy and oh-so delicious. Just like Mom used to make.

And that makes me very happy.

Have you ever had a cherished recipe from your childhood that wasn't quite as good as you remembered? When you think of the holidays, what foods come to mind? What appeared in your kitchen during every holiday season?


Three-time Carol Award finalist, Mindy Obenhaus lives on a ranch in Texas with her husband, the youngest of her five children and two dogs. She's passionate about touching readers with Biblical truths in an entertaining, and sometimes adventurous, manner. When she’s not writing, she enjoys cooking and spending time with her grandchildren. Learn more at www.MindyObenhaus.com