Showing posts with label quick lunches. Show all posts

Monday, May 20, 2019

Avocado-Feta Salsa Recipe Reminder

Jan here, with another Recipe Rerun ...err...Reminder...

I've been traveling - our semi-annual trip to Michigan and Indiana to visit family - and that means no cooking at all!

But we did stop by Jacob and Katie's (our son and daughter-in-law's) new home in Illinois on the way back! Visiting family is a great reason to love traveling!

Anyway, I wanted to make this recipe this week, so I dug it out of the old posts. I get so hungry just looking at those pictures!

* * * * *

Avocado-Feta Salsa

Yes, you read that right - Avocado and Feta together in a salsa.

It's fabulous!

Start here:

Avocado, tomato, red onion and cilantro. Chop it all up.


And then add a bit of this:


Throw in some garlic and a bit of oregano, and then mix it all together with a splash of olive oil and some apple cider vinegar (or red wine vinegar - whatever you have handy).

And here's the hard part.

Refrigerate for 2 to 6 hours.

*tap, tap, tap*

And then it's good to go! You can eat it with tortilla chips, pita chips, or.....


Twice-baked Zucchini Rounds! 

Take one of those big zucchinis - you know, the ones that were hiding in your garden until they're gargantuan size and you don't know what to do with them - and slice a few 1/4" thick rounds.

Cover both sides with olive oil, and bake on a cookie sheet for 5 minutes or so at 375°. Then take them out of the oven and top them with your favorite combo. I used the Avocado-Feta Salsa. Stick them back in the oven and broil them for a few minutes, or until the cheese starts melting.

Delicious!

I had a few of these for lunch with my Salmon with Garlicky Spinach (recipe here). It was a low-carb extravaganza!


And last week I put the salsa on my hamburger - now that was delicious!


Okay, I know I need to give you the official recipe:

Avocado-Feta Salsa
(originally from AllRecipes.com)

Ingredients:
1 plum tomato, chopped
1 ripe avocado, peeled, pitted and chopped
2 Tablespoons finely chopped red onion
1 clove garlic, minced (or 1/2 teaspoon garlic powder)
1 teaspoon oregano
1 Tablespoon olive oil
1 Tablespoon vinegar (apple cider vinegar, or red wine vinegar)
2 Tablespoons crumble feta cheese

Mix together gently. Cover and chill for 2 to 6 hours.


* * * * *

This is another quick and easy lunch! Just right for me since I'm trying to squeeze eating in between writing and packing up the house for our big move! Stay tuned for the details!


Jan Drexler spent her childhood dreaming of living in the Wild West and is now thrilled to call the Black Hills of South Dakota her home. When she isn’t writing she spends much of her time satisfying her cross-stitch addiction or hiking and enjoying the Black Hills with her husband of more than thirty-six years.


Monday, May 13, 2019

Black Bean and Corn Quesadillas Recipe Reminder

Jan here, with another Recipe Reminder!

What is it about some of my favorite dishes? I make them for a few times, then I stop for some reason. Maybe I'm out of one ingredient. Or maybe some shiny new dish comes into sight!

Anyway, like Missy last Friday, I went browsing for another recipe I had forgotten, and found this one from 2015. This easy dish is so good! I hope you enjoy it as much as I do!

* * * *
Black Bean and Corn Quesadillas

Today's recipe is an easy-peasy-lemon-squeezy do-ahead lunch. It has a lot of protein from the black beans and cheese, so it will keep you going all afternoon.

Okay, here we go:

Black Bean and Corn Quesadillas

ingredients:


2 Tablespoons oil, divided (I use coconut oil)
1/2 cup frozen corn
2 cloves garlic, pressed
1 Tablespoon chili powder
1/2 teaspoon each (optional - mix and match): cumin, cilantro (fresh or dried)
a dash of cayenne pepper
1 can (about 16 oz) black beans, rinsed and drained
1-2 Tablespoons lime juice
Shredded cheese (cheddar, fiesta blend, Monterrey Jack - your choice
Fajita size (6 inch) flour tortillas

Heat 1 Tablespoon oil in a large skillet for a minute or so, then add the 1/2 cup frozen corn. Cook, stirring often, for about 3 minutes, or until the corn is popping and browning.


Remove the corn from the skillet and set aside.

Pour the second Tablespoon of oil into the skillet, and add the onion, garlic, chili powder and other spices. Saute until the onion is soft - about 2 minutes.

Stir in the rinsed and drained beans and heat through, mashing the beans slightly as you heat them up.

Return the corn to the skillet and toss to combine.

Transfer the mixture to a bowl, stir in the lime juice and salt to taste (I usually don't add any salt).


Now you can refrigerate the mixture in a covered bowl, or use some immediately. 

When you want to make your quesadillas, lay one tortilla in your pan over medium heat (you can use the same pan you used before - if you're making your quesadillas immediately, just wipe out the pan with a paper towel).

On the bottom tortilla, spread about 1/6 of the bean mixture. Sprinkle with cheese, then top with a second tortilla.


Heat thoroughly, until the bottom tortilla is a bit crisp, but not browned, then flip (carefully) the quesadilla over and brown the other side. 


Cut the quesadilla into wedges and enjoy!

One thing I love about this recipe is that I can make all six quesadillas at once on the griddle for a family dinner, or I can make one at a time for my own lunch.

You can also substitute shredded chicken for the beans if you'd rather make chicken quesadillas. I think I'd add a can of green chilies, too.

There's no limit to the combinations you can try.


Do you like "make ahead" lunches? For me, it saves a lot of time and thinking at lunch time when I have a deadline looming!

* * * * * 

Back to 2019 - and some sad news. 

If you've been around the Cafe for a while, you've gotten to know my BFF, Thatcher.


With a heavy heart, I must tell you that my little guy is no longer with us. We had to make the hardest decision last week, but his painful days and nights are ended now. I never thought I'd miss this furry tornado so much. He was a wonderful dog.


Monday, April 9, 2018

Garlicky Salmon and Spinach...updated!

Jan here, and guys, I am so sick. By the time you read this, I should be feeling much better...but on Sunday afternoon, when the doctor at the Urgent Care said I had an ear infection and probably a sinus infection as well, all I could do was mumble my thanks and grab my prescription for antibiotics.

So since I've been unable to put two words together for most of the week, I decided to share a rerun recipe with you from five years ago. This is still one of my favorite lunches!


Garlicky Salmon and Spinach...updated!

This makes two weeks in a row that I'm sharing quick lunches! That's what happens when I've been working hard - I need good nutrition and I need it quick so I can get back to playing with my characters...or with a cute puppy :)

Thatcher at 12 weeks


I love salmon. It's easy to get, easy to cook, and sooo good for you! I buy those individually packaged frozen fillets - perfect for one person. I buy the skinless kind because my salmon-loving son prefers it, but this recipe would work for any salmon fillet, fresh or frozen.

Salmon with Garlicky Spinach

Ingredients:

1 salmon fillet per person
1 clove garlic, crushed
1 large handful (or two) baby spinach
1 Tablespoon olive oil
1/2 teaspoon butter
salt and pepper to taste

In a skillet, saute the garlic in the olive oil until it starts smelling absolutely delicious (about 1 minute). Lay the salmon on the garlic, then flip the fillet immediately to coat both sides. Cook for a couple minutes after flipping.


Turn the fillet over again and pile your spinach on top. Use plenty of spinach - it cooks down A LOT!


Reduce the heat to low, cover your skillet, and let it simmer until the spinach is wilted.


Next, remove the cover and push the spinach over to the side. At this point, check the salmon to make sure it's done (it should flake easily). Stir the spinach around with the pan drippings (the white fat that cooked out of the salmon is where those omega 3's are - stir it right into the spinach along with the garlic pieces). Finish it all off with just enough butter to give your spinach a delectable flavor, salt and pepper to taste, and serve.


Breaking in here with an update....

A year ago or so, I bought some frozen shrimp to use in salads or whatever, and decided to add them to this dish one time.

Seafood heaven!

For this quick addition you need a couple tablespoons of pre-cooked frozen shrimp...the really shrimpy kind (about 1/2" long), a teaspoon or so of butter, a little more garlic (I often use garlic powder instead of fresh), and a Tablespoon of bread crumbs.

While the salmon is cooking, add the shrimp and butter to another corner of the skillet and let them thaw and brown slightly. Add the bread crumbs and garlic powder and stir it all together.

When everything is done, lay the salmon on your plate, then top with the browned shrimp & bread crumb mixture. Put the spinach on the side, sprinkle with a bit of Parmesan cheese, and you have a fancy, decadent quick lunch.


Now that's brain food to keep you going all afternoon!

Monday, October 30, 2017

The Quickest Salads for Lunch

Jan here, still crunching my November deadline. Even though I have a two week extension, whether I meet it or not is still pretty dicey.

It's a good thing I work well under pressure!

And again it means that I have done no cooking this week. We have leftover soups in the freezer that I heat up in my Insta-Pot on cold evenings...and yes, once this deadline is over, I'll talk about freezer meals that don't take an entire Saturday to prepare, but we'll have to wait for a couple weeks.

Meanwhile, my lunches are quick and nutritious. I either heat up leftovers from the night before, or I make myself a salad. I need to get more of these salads I discovered a few years ago. They've saved my lunches more times than I can count!


The Quickest Salads for Lunch


I think you might know by now that I love spending time in the kitchen, cooking for my family and friends...

...but occasionally I have a day when time is a premium.

Like when I'm in the middle of rewriting a proposal for the third time.

Or when inspiration hits and I just CAN'T step away from the computer, even though my stomach is telling me my time on this earth is going to expire if I don't send something down SOON!

On those days, I usually resort to a spinach/cheese omelette (about 15 minutes prep, but very satisfying), or PB&J (about 5 minutes prep, but not satisfying at all).

And then I found these at Sam's Club last week:


I usually pass by items like this, but that day they were giving out samples (don't you just love those samples!), and I thought, I think it's time for some convenience foods....

I started with the Asian mix (yes, I bought one of each!). When I opened the package, this is what I found:


The veggies are a blend of cabbage, carrots and cilantro (mmm, I love that cilantro...). The dressing is an Asian style sesame/ginger dressing (with no MSG - I checked), and then there were little rice snack thingies and slivered almonds to use for a garnish.

The package said there were 3.5 servings, with 120 calories per serving. I split the contents in half - which gave me a humongous salad for Thursday and another one for our Father's Day picnic yesterday.

The view during our picnic on Father's Day :)


And it was delicious.

How much time did it take? About 3 minutes, including stopping to take photos!

And then I revised another scene of my new story while I ate my lunch.


I'll be eating the Garden Salad version this week - probably Tuesday and Thursday.

:) I love it when I have lunches all planned out!


And, of course, Monday wouldn't be complete without a gratuitous puppy picture!

Thatcher, 11 weeks


* * * * * * * * * * 

Back to 2017! Isn't that picture of Thatcher adorable? I can't believe he grew up so fast.

Working on a tight deadline can be stressful, but having meals planned and prepared removes a LOT of that stress.

So does a Saturday afternoon hike in the Hills....

Sunset in Custer State Park

...and a drive through a couple of our local parks.

What is your favorite stress reliever?


Jan Drexler loves her family, her home, cooking and just about anything made by hand. But she loves her Lord most of all.

Stop by Jan's website to learn more about her books: www.JanDrexler.com

Monday, September 11, 2017

Parchment Paper Packets

Jan here, with a quick lunch idea.

This isn't original with me, but it's something I've recently discovered, and it has added to the variety of my quick lunches.
Writers work under time crunches, and I don't know about anyone else, but when I'm on a roll and my characters are speaking to me, I forget that I need things like...oh...healthy food. I'm more likely to grab a peanut butter fold-over than a healthy lunch on days like that!
So I'm learning to plan and prep ahead!

Here’s my new favorite - 

Parchment Paper Pockets (Jan's Version):


Parchment paper is wonderful. It's inexpensive, easy to use, and works perfectly for this application.

Start by tearing off enough parchment paper from your roll to make a square. You can leave it as a square, but I like to cut it into this heart shape. The curved edges are easier to seal - you’ll see what I mean in a few minutes.


By the way, I usually make two of these at a time, or even three or four. As long as I’m cutting up the veggies, I might as well, right? They freeze easily, and cook from frozen, so I can grab one out of the freezer when I want a last minute quick lunch!

Anyway, now that you have your parchment paper ready, it’s time to start building your lunch.

First, preheat your oven to 400 degrees.

Start with a protein. I used frozen Tilapia here, and salmon in my next one, and you can also use chicken, or beef. Your protein can be frozen or thawed - it doesn’t matter.
For a vegetarian version, you could use cooked beans such as Great Northerns or Garbanzos.
The main thing to remember is that you want the meat to cook thoroughly, so use thin fillets, or cut thin strips.


The next thing to add are your healthy carbs. Some cooked rice or quinoa goes well. Or some diced potatoes, either regular or sweet potatoes. For this Tilapia version, I didn’t have any healthy carbs on hand, so I added some whole grain crackers to my meal at lunch time.

Now add some non-starchy veggies. We have a lot of zucchini right now, so I diced some up. I also added some broccoli to my Tilapia version. And I love greens, so I added frozen spinach to my salmon packet.

When adding your veggies and carbs, you want to keep the total volume to about 2 cups. You also want to make sure that you cut/dice your ingredients to a uniform size - I chop mine in about 1/2” cubes.


Now it’s time for seasonings! I used diced onions and a crushed garlic clove, along with some Mrs. Dash in my Tilapia version. It needed more salt, so I added that after cooking. And since I wanted my salmon version to be richer, I added a teaspoon of butter. You can add whatever seasonings you want, and add them to taste. Experiment!


Finally, we need liquid. The food is going to steam inside the packet, and it won’t steam without liquid. If you’ve used frozen proteins and veggies, there is moisture already, and you shouldn’t need to add more. But if all of your ingredients are fresh, add a sprinkle of water or a dash of broth. Not too much, though, or you’ll end up with soup. Don’t ask me how I know!

The salmon version, waiting for me to add a pat of
butter on top.

 The last step is to crimp the edges of your packet to seal it. I didn’t think this would work when I first heard of it, but it does! Fold the top of the packet over until the edges meet (you may need to do some adjusting with your filling), then, starting at the top of the heart, fold about a quarter inch over, then over again. Move a bit to your right, and repeat. Continue folding and crimping the edge together until you get to the bottom of the heart. Fold the little tail under the packet, and you’re done.


Put your packet on a baking sheet and cook for 20 minutes at 400 degrees, if your ingredients are fresh, or 30 minutes if they’re frozen.

Once your lunch is in the oven, the additional packets you put together can go in the freezer. Put them in freezer bags or freezer containers, and be sure to label them!
When you're ready to cook these frozen packets, just take them out of the freezer and stick them in the oven - no thawing necessary! Be sure to cook them for the longer 30 minute time.

Be sure to enclose your packet in a freezer bag or other
container to prevent freezer burn!

And when the time is up, your lunch is ready! Open the packet carefully - steam can be wicked hot - and either enjoy it straight from the packet, or transfer your lunch to a plate.
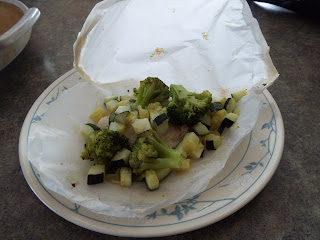
Tilapia, zucchini, broccoli, onion, garlic, Mrs. Dash


Salmon, zucchini, spinach, onion, garlic, salt, pepper
 and one teaspoon butter

One of the things I love about these packets is that they are so versatile! Here are some ideas for fillings that I thought of:

Ground beef (precooked), diced potatoes, diced onions, oregano, basil, thyme and a couple tablespoons of beef broth with 1/2 teaspoon of flour whisked in. Salt & pepper to taste.

Ground beef (precooked), rice (precooked), diced tomatoes, diced onions, diced green peppers, taco seasoning. You could eat this one wrapped in a tortilla.

Chicken breast (sliced thin), brown rice (precooked), frozen chopped spinach, parmesan cheese, garlic, oregano, basil, salt & pepper to taste.

Lean steak (cut into thin strips), diced sweet potatoes, frozen chopped spinach, powdered cumin, salt & pepper to taste.

Can you think of any other combinations you might try?


And be sure to watch for this two-in-one deal in your local store, or order on Amazon. 


This is the re-release of my first book, and I'm so happy it's available in book form again! If you've read "An Amish Courtship," then you'll be familiar with some of the characters in this book.

Here's a short description: A criminal's trail has brought FBI informant Bram Lapp to Ellie Miller's Indiana community. Now he's posing as the kind of man he once hoped to be—someone who might be worthy of Ellie. Because no matter how much she claims she doesn't want a second chance at love, he knows he's found the home they were meant to share.


Jan Drexler loves her family, her home, cooking and just about anything made by hand. But she loves her Lord most of all.

Stop by Jan's website to learn more about her books: www.JanDrexler.com


Saturday, March 18, 2017

Baked feta repost and wishing for spring!

Helloooooo, everybody! Mary Jane here. We've had the wettest, rainiest spring in nearly 20 years. Great for farms. Not so great for flooding. We live a few hundred feet from the Walla Walla River and it's getting high... but so far, hasn't crested the bank. So I'm in a SPRING DREAMING MOOD!
I'm reposting my baked feta recipe in hopes all the spring pictures will come true!


 Spring has sprung here in Oregon. And do you know how Richard Armitage (bless his gorgeous self) is related to spring??
 
Well, I'll get to that in a minute. But first a peek at my backyard...
Everything is in bloom. The bees are out (must buy sandals, note to self!), the frogs are croaking, and the tulips, iris, and lilacs are bursting with flowers!
Little boys with butterfly nets are scouring the garden (in snow boots) for prey.
The turtles cavorted in the tall grass as we cleaned their tank. Don't blink. You might miss them. They can actually get quite far away when you're watching for butterflies.
We tried to hem them in with bodies, but the little guys kept moving away and creating a gap for escaping into the far reaches of the lawn.
                                         
Here's a little guy very pleased with his flower, carefully placed in an antique egg cup. I didn't realize he could reach that shelf. He got the egg cup, filled it with water, and picked his own flower. Cute! And now I'll go move those breakables just a bit higher...
Our yellow climbing roses are blooming. They're in the hedgerow. You have to look hard. (Ooooh, I can hear him now!!)
 
*sigh* Isn't he wonderful? here's the full clip here, if you want to watch it. I'll wait... The relevant moment is 3:44. :)

 Ok, now that we've had our Richard Armitage fix for the day, let's see what there is to cook. I'm not feeling the need for anything super difficult. Hmmmmm. Edna reminds me there's some stinky cheese in the fridge and some large sourdough boules. 
 
An older kid is on hand to help with preparations so I'll man the camera while she works. Cutting the top off the sourdough bread is the first step.
Getting the feta cheese, parsley flakes, tomatoes and garlic out is the second step. I have an odd jar of olive and red pepper tapenade so I think I'll make one with that, too.
Hollow out the bread and place it in a bowl, crumbling slightly. This will help hold all the feta and tomatoes together.
Yummy. Give me a fork.
Add garlic, parsley flakes and mix well. Put it back in the boule... HEY. Someone has taken a bite.

And I found him over near the other one. Shoo, shoo!!

*sigh* It seems everything must be taste-tested for freshness before we cook it.

Wrap the boule in foil and bake at 350F for 20 minutes.
This is the olive tapenade and feta version. The red peppers gave it quite a kick! Mmmm. Even the next day, it was good, heated a little in the microwave. This dish is definitely not a 'date night' dish, unless you don't mind feta breath. 

And to round off the spring-y post, here's an old table I picked up for super cheap. It was a wreck. But something about those lines... Edna whispered the legs were mighty fine, quite shapely. I agreed. 
Some scraping and painting (some by small children, don't flip it over since they got to paint the underside) turns into this. And in that stack is- you guessed it! North and South by Elizabeth Gaskell. have I mentioned that she's a hero of mine? She wrote her books at her kitchen table, with five kids, a minister husband who gave lessons to the poor in their living room. And she wrote romances that changed LIVES. Just love her! 

  I think she was also a lovely friend. She and Charlotte Bronte were pals but one time visitors came knocking while Charlotte visiting. Being afflicted with crippling shyness, Charlotte was in tears, until Mrs. Gaskell told her to hide in the curtains. So she did. And Mrs. Gaskell entertained them, never letting on that one of the most famous authors of the day was hiding just a few feet away! What a woman. What a hostess!

 Anyway, go out and enjoy the sunshine! If there's no sun, watch North and South. A little Armitage makes everything better.

 Until next time!

Be sure to stop by my facebook pages at Mary Jane Hathaway or Virginia Carmichael for all my up to date book news!