Showing posts with label cheese. Show all posts

Wednesday, September 11, 2019

A Yank Take on Quesadillas

This past summer, when we were in Maine, my daughters and I visited a fascinating restaurant that had a variety of interesting globally-inspired, locally sourced dishes. By far, the best thing I tasted was the cheese quesadilla appetizer. Had I known how good it was, I'd have ordered two and skipped the main course. I also would have taken a photo so you could see what lives on in my memory.

I imagine the quality of the ingredients had something to do with the flavor, but what won me over was the cheese crust on the outside!

You know how when you make grilled cheese, you get the crispy parts where the cheese melted off the bread and toasted on its own? The entire crust of this was like that. I'm not entirely sure how they did it, but it was amazing - an entire cheese crust on the outside - and then there was the cheesy goodness inside.

I'd also had a veggie quesadilla recently that was okay (though it looked like it had been made with frozen veggies).

I decided I wanted to try to combine the two.

The result wasn't particularly pretty (my technique in crust-making left something to be desired), but it sure did taste good!
 First, I tried putting shredded cheese on the outside of the tortilla. Once it was melted, I flipped it to add the fillings - shredded pre-cooked chicken, veggies, and more cheese.


It didn't hold together well once I flipped it because I always tend to overfill with yummy fillings.


It's not a great photo, but you can get a bit of an idea about how the cheese crusted the outside.

Edited because I came up with a better plan.

After typing this up, I was hungry, but I had to take Fenway for a walk. SO, as we walked, I pondered how to improve on it.

Problem #1 was overstuffing. Not necessarily a problem if you prefer taste over appearance.

so - just cheese and chicken this time

Problem #2 was the cheese not spreading well.

Solution - I put the tortilla in the pan and put the cheese on top to melt at low heat. Once the cheese was melted, I flipped it for the crustiness. Then I put in the cheese and chicken.

For the top part, I decided to experiment with melting the cheese in the microwave. That was still pretty good, but not as good as the first way.

Then I tried the pan solution, but folding it over. I think that worked best.

Photographic evidence:


So, what do you think? Would you like a Yank Quesadilla?

Wednesday, January 9, 2019

The Happy Hollister Book Club

One of the things that I love about being a writer and a reader is how scenes from a book will just stick with you.

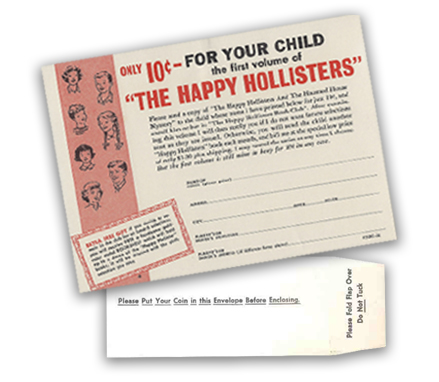
The scene I'm writing about today has stayed in my imagination for over 50 years. I'm sure I’ve talked about this before - either here or on Seekerville - about how I used to get The Happy Hollister books in the mail every month when I was a child.

I seriously wanted to be part of their family, because they always did such cool things and had such fun together.

For the uninitiated, The Happy Hollisters are a family of five children - Pete, Pam, Ricky, Holly and Sue - who lived with their mother and father in a rambling house on a lake in the fictional town of Shoreham. (I don’t think I ever really knew where Shoreham was, but it still exists in my imagination as sort of a utopia - except for the resident bully, Joey Brill.)

Mr. Hollister owned The Trading Post and Mrs. Hollister stayed home to take care of the children, their donkey Domingo and their dog and cat, but they weren't often home they were always off on fun trips solving interesting mysteries. As an adult I look back at the idea that these children, the oldest of whom was 12, were off solving mysteries that the adults couldn’t solve as kind of humorous, but as a child I loved it and I looked forward to getting the two books in the mail each month. That was far and away the happiest day of the month.


From the website:  Over one million children joined The Happy Hollisters Book Club between 1962 and 1971—were you one of them? Joining was easy: you (or your parents) simply sent a dime (yes, one thin dime!) to become a member. In exchange, you received a copy of The Happy Hollisters and the Haunted House Mystery, sold in bookstores for a whopping $1.95. The initial volume was yours to keep, even if you canceled your membership immediately. If you didn’t cancel, you continued to experience the joy of reading The Happy Hollisters, receiving one new volume each month for the low cost of $1.00 (plus shipping and handling)—what a swell deal that was!


I don't remember this part, but I sure do remember getting the books every month!

I also found this on their website:

"Andrew Svenson’s goal in writing the youth mystery novels series was to encourage a love of reading in children; each book was planned so that the first page would draw the reader in with a dangerous or mysterious situation, and each chapter would end with a cliffhanger or exciting twist that encouraged the child to turn the page and keep reading."

As an author, I love the connection so many *cough 50 cough* years later. 


So why am I blogging about The Happy Hollisters, you may be asking.

Well, I've been craving cheese and potatoes lately, and that brought to mind a scene from one of the books. I'm pretty sure it was from The Happy Hollisters and the Swiss Echo Mystery. In the scene, the Hollister children are visiting in a mountain village and one of the locals is a cheese maker. He shows them how they can take hot potatoes and hold them against the spinning wheel of cheese to make a tasty treat.


Honestly, on a night when I don’t kick feel like cooking, a big wheel of cheddar cheese and hot potatoes sounds like a fabulous combination. Alas, I had to settle for cheesy fries to satisfy the craving, but the memory of reading that scene made them taste spectacular!

So my question for you today is are there any scenes from books that particularly stand out for you because of the food?

And what is your best recipe involving cheese and potatoes?


Tuesday, April 24, 2018

Classic Recipes Revisited - Impossible Cheeseburger Pie


by Mindy Obenhaus

Last week I talked about being in a food rut. Making the same old things over and over again until I was just plain bored. So this week, I decided to go back to some classic recipes and, perhaps, even tweak them a bit.

What makes a recipe a classic? It’s something that has withstood the test of time. Nothing trendy, although it may have been at one time before easing into its little black dress and pearls.

The “Impossible” recipes were all the rage back in the late 70s, early 80s when Bisquick came out with them. I remember my mom making Impossible Pumpkin Pie and Impossible Taco Pie. But there was one she didn’t make that somehow became my favorite. I don’t recall when I first had it, probably at a friend’s house, but made its way into my classic recipe file.

Impossible Cheeseburger Pie 

It’s a quick, easy and inexpensive meal. Nothing fancy, but seasonings lend a wonderful flavor that satisfies your taste buds as well as your appetite.

Start with one pound of ground meat. Whatever you like. Ground beef, turkey, venison… I used venison because, well, I have a freezer full of it. Brown the meat with 1 cup chopped onions.
This is where I decided to change things up just a tad. I mean, even the classic little black dress needs a new pair of earrings every now and then. Keeping in mind that this is cheeseburger pie, I began to think. What do people like on their cheeseburgers?

Bacon!

So I cooked up three slices of bacon until crisp, chopped them up and added those along with ½ teaspoon of salt and ½ teaspoon garlic powder.
Stir that together and spread into the bottom of a greased pie plate.

Sprinkle with 1 cup shredded cheese (I use sharp or extra sharp) and jalapeƱo slices, if desired (hubby’s request) and set aside.

Now come the part that makes this “Impossible.”
Mix together 1 cup milk, 2 eggs, 1 tablespoon Worcestershire sauce (we’re talking cheeseburger, after all) and ½ cup Bisquick until well blended and pour over the cheese/meat.

Bake in a 400 degree oven 25 minutes or until knife inserted in center comes out clean.

Allow to cool 10 minutes before cutting/serving.

This was the perfect quick meal for a Sunday night. I didn’t spend forever in the kitchen, everybody loved it and there weren’t a ton of leftovers.

Signs of spring continue to emerge here at the ranch. The calves continue to come. This little gray one is hubby’s favorite.
And look who’s finally returned.

The hummingbirds found us at our new house.

While we were watching the hummingbirds, we heard a squirrel chattering up a storm nearby. We spotted him/her in a tree, scolding a couple of birds who got too close to her nest. (I’m not 100% sure it was a she, but considering the way it was going all mama bear, it’s a pretty good bet)
Later, she emerged.

Only to watch us before retreating once again.

Now it’s your turn. What are some of your favorite classic recipes? Do you like to play with them or prefer not to mess with perfection?


Three-time Carol Award nominee, Mindy Obenhaus, lives on a ranch in Texas with her husband, the youngest of her five children and two dogs. She's passionate about touching readers with Biblical truths in an entertaining, and sometimes adventurous, manner. When she’s not writing, she enjoys cooking and spending time with her grandchildren. Learn more at www.MindyObenhaus.com
 

Friday, April 21, 2017

Garlic and Cheese Grits Casserole from The Belle

Missy Tippens

I've got a good southern recipe for you today! For those of you who've said in the past that you can't even buy grits at your grocery store (and I'm sad about that!)...well, you need to order some online! You need to try this. I served it for Easter lunch.

I based my recipe on one from Trisha Yearwood. Click here for the original, which is a video of her making Garlic Grits Casserole. I watched it and jotted all the ingredients. :) Then I modified it because I wanted to double the recipe--and while I was making my decision about how much cheese to buy, someone grabbed the last two packages!! (I think it was a woman I had just been talking to who probably overheard me tell my husband that the cheese was buy one get one free!) If she hadn't already disappeared, I might have begged. LOL Instead, I came up with Plan B.

This is the doubled recipe, so it's enough to feed a crowd (probably 15-20).

9 cups salted water
2 cups Quick Grits
2 5-ounce packages of garlic herb cheese (I used Boursin)
8-ounce package extra-sharp cheddar, grated
1 stick butter + 2 TBS butter
4 eggs
1 cup milk
2 cups cornflakes cereal, crushed

Boil the water. Stir in the grits and cook until thickened. Here's the garlic herb cheese I used.


Once the grits are thickening, crumble in the cheese. Next add in the 1 stick of butter (reserve the 2 TBS for the topping).


Then add in the grated cheddar. (Trisha's recipe only called for the garlic cheese, but the casserole I grew up eating also had extra-sharp cheddar, so I chose that for doubling my recipe.)


In a bowl, whisk together the eggs and milk.

Scoop out a ladle full of the hot grits and mix with the eggs/milk to temper it. I actually tempered with 3 or 4 ladles full. Then I stirred this tempered mixture into the pot of cheese grits.

Next, pour this into a large casserole dish. Mine nearly overflowed, so I ended up pouring this into a large, greased cake pan.


Crush the cornflakes (my daughter did it in a ziplock bag). Melt the 2 TBS butter and mix into the cereal. Sprinkle this topping onto the casserole.


Bake at 350 degrees for 45 minutes or so, until bubbly throughout.

Enjoy a bit of southern tradition!

www.missytippens.com

Wednesday, April 5, 2017

Something Yummy This Way Comes

I recently saw a group of 8th graders doing an amazing performance of Macbeth. I'd forgotten that the line "Something wicked this way comes," derives from the Scottish play.

Anyway, it popped into my mind as I was writing this blog and switching yummy for wicked certainly fits.

Warning - there is nothing healthy about this post, despite me being known as the healthy writer. Sometimes you just need comfort food.

Are any of you fans of the Stouffer's pizzas?

I used to love the 5 cheese white pizza. I haven't had it in a while, and I wasn't consciously trying to imitate it, but my daughter and I both agreed the result of my experiment tasted remarkably similar (in all the good ways).

The background: it was late, I was hungry. I needed something fast and filling.

I had a loaf of Italian bread. I had cheese.
I opened the cabinet and grabbed my freeze-dried garlic and set it to soften in some olive oil. I spread that mix on the halved loaf of sesame bread.

I sprinkled some cheese over that, mixed in some oregano, basil, and more garlic, then covered with more cheese and baked.

Oh, did it ever smell delicious!

It tasted even better!!!


I did remember to take photos!


Tuesday, September 13, 2016

Mega Stuffed Mushrooms - Quick & Easy Dinner Idea

Believe it or not, Tex is here with a dish even a vegetarian could love. That means that if my old buddy, Kav, should decide to visit, she would not go hungry or have to live off of cereal. 
Well, that is assuming she likes mushrooms.

This is what I'm talking about.
Of course, these aren't your average button mushrooms. These are those big ol' portabella mushrooms, filled with all kinds of yummy cheese.

Hubby and I saw these at the store a few weeks back and decided to give them a try.
Love them!

They had a few varieties. Some with cheddar cheese and pico de gallo, others had cheddar and jalapenos. These here had mozzarella and spinach (I think that's Italian seasoning on the top).
These are great when I'm on deadline and have to send hubby to the store to grab something quick for dinner, but they would be so easy to make at home.

Simply remove the stems from a portabello mushroom and fill with cheese and whatever else you like. You could do a pizza one with a little pepperoni, a mexican style with the pico de gallo or jalapenos. Just use your imagination.

Once they're filled, line a baking sheet with aluminum foil (not a must, but definitely makes cleanup easier) and brush the bottoms and sides of the mushroom with melted butter.
If you have extra, go ahead and brush some across the tops, too.
Then sprinkle with a little bit of salt.
I also sprinkled some on the tops.
You could also add other seasonings, such as garlic powder, pepper, Italian seasoning... On the pico and cheddar ones I added a little bit of fajita seasoning.

Place pan in a 350 oven, 
and bake until cheese is melted, 10-15 minutes.
Juicy.
Not to mention filling.
Like I said, these are meal worthy. Though they also make a great side.
Ooo, imagine one of these with a steak.(No, I would not serve that to Kav)

You know, I don't usually pick up pre-made items like this, but in this case, I'm so glad I did.


Mindy Obenhaus lives in Texas with her husband and kids. She's passionate about touching readers with Biblical truths in an entertaining, and sometimes adventurous, manner. When she’s not writing, she enjoys cooking and spending time with her grandchildren. Learn more at www.MindyObenhaus.com.

Tuesday, February 9, 2016

Amy's Easy HOMEMADE Macaroni and Cheese

Sometimes, simple things are the best. As I found out over the holidays when my oldest daughter said she wanted to make HER macaroni and cheese for one of our meals.

Now I've shared my recipe with you before (click here to see it), and it does take some time to make, but hey, it's got American, Havarti and cheddar cheese in it, plus some great spices that take it to the next level, right?

Yeah, well, nothing like being shown up by your kids. 

And for those of you who are familiar with Lindi Peterson's Crock Pot mac and cheese, this is even better, not to mention quicker, than that. (Sorry, Lindi. You know I still love you.)


Here's what you'll need for this yummy dose of comfort food:

8 oz. Velveeta, cubed
8 oz. Cracker Barrel Extra Sharp cheese, grated (for whatever reason, the flavor this lends is superior to regular extra sharp cheese)
1 can condensed Cheddar Cheese soup
1 cup cream (you can also use half and half or milk, but the cream makes for a richer flavor)
16 oz. package of your favorite elbow macaroni, cooked according to package instructions
Ground black pepper (optional)
1/3 cup bread crumbs (I prefer the Italian style, and while I happened to have the Panko (crunchy) variety on hand, you can use  whatever you like)
2 tablespoons butter

Okay, if you haven't already, go ahead and cook your macaroni. 

Preheat oven to 350 degrees.

Meanwhile, in a large skillet or saucepan, combine the soup, Velveeta and Cracker Barrel cheese over medium-low heat. 
Be patient and be sure to watch it, because you definitely don't want to burn your cheese. 

See, it really doesn't take that long.
I like to use a whisk to help eliminate any lumps.
Stir in your cream or milk.
If you like, add pepper to taste. I added about a 1/2 teaspoon.
Add the cooked macaroni.
And stir to coat.

Pour into a greased baking pan. An oblong casserole dish works well.

Next, over medium heat, melt butter.
Like you didn't know what that looks like.

Once butter is melted, add your bread crumbs.
Stir until butter is absorbed.
Then sprinkle over top of macaroni and cheese.

Bake at 350 for 25-30 minutes, until top is golden and cheese is bubbly.

That's heaven in a skillet, I tell ya.

I don't know about you, but for me, mac and cheese is the ultimate comfort food. One I rarely allow myself to indulge in. So when I do, I want it to be good. This fits the bill perfectly. And it's great when feeding the masses. 

So today I stand before you, admitting that my daughter's mac and cheese recipe is better than mine.

'Nuf said.

Now let's talk football. How many of you watched the Super Bowl? Anyone disappointed with the game's outcome? 
Not me. I like Peyton Manning and cheered him on all the way, with plate full of ribs and Amy's mac and cheese. :D