Showing posts with label weddings. Show all posts

Monday, October 5, 2020

Preparing for Winter

 "Preparing for winter?" I can hear you say. "But it's 80° outside!"

Jan here, telling you it's time.

Do you remember last year when that sudden snow storm had you scrambling for milk and bread along with the rest of your city? Or when the food supply chain was disrupted in March? The grocery stores are not fun when that happens!

Now, when we're in the midst of gorgeous autumn days, is the time to make sure your pantry is stocked.


So, last week I inventoried my pantry, checked to make sure all the stored foods are in good shape (no rusty cans or leaking packages,) and bought a few items to bring everything up to par.

And then I noticed a problem. We store dry beans and use them often, but we didn't use many of the Great Northern beans or Navy beans last year.

When beans are stored too long, they dry out even more than they are when you buy them. And the older and drier they are, the longer it takes to cook them. What's the solution? I can them!

Canning beans is easy-peasy if you have a pressure canner (if you don't have one, maybe you can borrow one from a friend or neighbor,) and it's even easier if you have a pressure cooker! Be sure you read the instructions for both appliances.

Super simple - 

First measure out your beans (I used four cups of dry Navy beans.) Rinse them and sort them, then it's time to cook them.

If you have a pressure cooker (aka Instant Pot or similar appliance,) put your rinsed beans in your pot along with enough water to reach the 1/2 mark on your liner. Add a couple tablespoons of apple cider vinegar, then seal your pot. Cook on high for about 30 minutes - longer if your beans are as old as mine. Let the pressure release manually. The entire process takes about an hour and a half.


If you don't have a pressure cooker, soak the rinsed beans in a large bowl or pot with plenty of water and the apple cider vinegar.

What does the vinegar do? It helps get rid of the enzymes that cause people to avoid beans. And it works!

Anyway, after soaking for 12-24 hours, rinse the beans again and cook in a large pot with plenty of water for about 30 minutes.

No matter which method you used to cook your beans, rinse them again after cooking.

While your beans are cooking, prepare your canning jars. Four cups of dry beans will fill about seven pint jars. Wash the jars and sanitize them (your dishwasher is the perfect appliance for this step.) Also, be sure to check the rims of your jars for any cracks or chips. If you find any, throw that jar away and use a different one. A cracked or chipped canning jar is dangerous to have around!

And prepare your lids - put them in a bowl alternating right side to wrong side so they don't nest. Cover them with boiling water until you're ready for them.

Fill the jars with the cooked beans to about 1" below the rim of the jar. When in doubt, put fewer beans in. Now put 1/2 teaspoon of salt in each jar, then fill the jar with boiling water to 1/2 inch below the rim. The threads of the screw top are at that 1/2" point.


Wipe the rims of the jars with a clean cloth dipped in boiling water to remove any spilled liquid or food. Then, using tongs, gently place a lid on each jar and screw on the ring until it's a bit tighter than snug.

Put about 2" of water in the bottom of your canner, then carefully place the jars in (be sure to use a canning jar lifter.)

Here's where you really need to follow the instructions for your pressure canner and your canning guide. Mine has a dial pressure gauge, and according to Ball's Blue Book, I need to keep the pressure at 12 pounds for my altitude (4000 feet.) The pressure needs to remain at that level for one hour and forty five minutes for pint jars.

And I don't fool around with this detail. I watch the canner closely for that entire time, and often keep it a bit higher than 12 pounds. Once your canner is up to pressure, it doesn't take much heat to keep it there. During the canning time, I'm constantly adjusting the burner's setting lower.

After the required time, turn off the heat and let the pressure canner cool naturally. This isn't a step you want to hurry! If you need to run an errand or head off to bed, no problem. The jars can remain in the canner for several hours if you need them too.

Once all the pressure is released, carefully open the lid. Take out the jars with your jar lifter and set them on something heat resistant to cool. Leave a couple inches between the jars. As they cool, you'll hear the beautiful sound of the lids sealing with a "pop" or "ping!"

Beans aren't the only things I'm canning, though. Thirty pounds of apples from Washington made lovely applesauce. And next week, I'll work on vegetable soup.


 I'm also brushing up on my bread making skills - both yeast breads and sourdough. And yes, that makes my husband very happy.


I know it sounds like a lot of work, but for me it's worth it for the peace of mind. We live thirty minutes from the closest grocery store, and it's good to know we don't have to depend on making that drive when a storm is on the way.

How do you prepare for winter? Do you stock up with a few extra cans of soup or bags of rice?

And before we go, I have to share a couple wedding pictures with you!

If you remember, our son Benjamin married Erica Vetsch's daughter Heather back in July. It was a beautiful wedding and a wonderful day!

First of all, the BROTHERS! This is Benjamin with his two brothers and two brothers-in-law. A pretty formidable bunch! Don't you love those epic beards?


I love this picture of the "first look!" Such a sweet couple!


But this one is my favorite. Look at those faces! How happy can two people be?


*sigh* Don't you love weddings?


Jan Drexler has always been a "book girl" who still loves to spend time within the pages of her favorite books. She lives in the Black Hills of South Dakota with her dear husband of many years and their active, crazy dogs, Jack and Sam. You can learn more about Jan and her books on her website, 
www.JanDrexler.com.


Tuesday, October 10, 2017

Fabulously Fancy Cupcake Hack (And a Cover Reveal)

Mindy here, and last week south central Texas was treated to a beautiful harvest moon. If only this picture did it justice. But it was big and oh, so bright.

Have you ever wondered why they call it a harvest moon?

I did, and in case you’re wondering, here’s what I learned.

A harvest moon is the full moon closest to the autumnal equinox and it’s often referred to as a harvest moon because its bright light allowed farmers work into the night to harvest the last of their crops.


Thought that was a fun little factoid.


So we went to wedding this past weekend.


Don't my guys look sharp?

I don’t know about you, but one of the things I look forward to most at weddings is the cake.


Doesn't this look amazing?
I could hardly wait.

Except we were all so exhausted that we ended up bowing out before the bride and groom cut the cake. Which meant I woke up the next day craving cake. Fortunately, I had a mix on hand so I whipped them up in no time. When it came to frosting them, though, I found myself with a dilemma.

You all know how I love to pipe swirls of icing atop my cupcakes, except all of my piping bags and tips are in storage.
Really?
What was I thinking?
I obviously wasn’t. So I dusted off my thinking cap and came up with an idea.
A zip-top bag!
I have plenty of those.
I simply snipped off one corner,


Added my buttercream frosting (recipe here) to the bag,

Twisted the top so it wouldn’t go shooting out the wrong end and set to work.


Simply start piping the frosting around the outside edge and work your way toward the middle until you have a nice little peak.

Tah, dah!
And believe it or not, the cupcakes were frosted in less time than it takes to spread the icing with a knife. I can just envision these with some of those edible pearls to dress them up.
Go ahead, grab yourself a cupcake because we’ve got some celebrating to do.

This announcement is way overdue, but here goes.
I am proud to announce my very first Christmas book.


A Family for Christmas

Lacie Collier is determined to give her niece, Kenzie, the best Christmas ever! But Lacie’s got her work cut out for her when they spend the holidays at her Christmas-averse mother’s home. With his focus on keeping his own mother’s holiday traditions alive, sheriff’s deputy Matt Stephens is surprised to see his old friend Lacie back in Ouray. He’s always regretted that their friendship became strained after he started dating her sister in high school. But it’s pure shock he experiences when he sees Kenzie, whose uncanny resemblance to Matt is undeniable. This Christmas will bring new memories for Lacie and Matt…if they can open themselves to the possibility of love.


I love Christmas and I love, love, LOVE this story. It was challenging to write, but all came together nicely.
Isn't the cover gorgeous? Cute, outdoorsy guy, cute kid... What's not to like?

So what do you think? About the cupcakes, the cover...?


Mindy Obenhaus lives on a ranch in Texas with her husband, the youngest of her five children and two dogs. She's passionate about touching readers with Biblical truths in an entertaining, and sometimes adventurous, manner. When she’s not writing, she enjoys cooking and spending time with her grandchildren. Learn more at www.MindyObenhaus.com  


Monday, February 20, 2017

Nachos for a Crowd (or only a few)

I'm not sure I've seen a happier bride.

(all photos by Megan of MNM Photography)


The groom had a few nerves, but not too bad,


Especially when he and his best man got a chance to have some fun for the photographer before the wedding. :)


But Jacob and Katie are married now, and the wedding was perfect.


We even had the groom's favorite for the wedding cake - Cheesecake!

I didn't get a picture of the nachos, though. I remembered to take the emergency kit to the church: needles, thread, double sided tape, duct tape, stapler, bandaids, alcohol wipes.... But no camera.

So you'll have to use your imagination!

This is Katie's recipe, and it was super simple and delicious!

Nachos for a Crowd (or only a few)

ingredients:

ground beef
taco seasoning
nacho cheese

tortilla chips

Toppings:
sour cream
chopped onions
chopped tomatoes
shredded cheese
jalapeno slices
black olives
lettuce


The amounts you use depends on the number of people you are serving. We were planning for 80-100 people, so we used 12 pounds of ground beef. For a family, you'd use only one pound.

Brown the ground beef until it's thoroughly cooked. Add the taco seasoning (1 package per pound of ground beef) and cook according to the package directions.

Add the nacho cheese - the canned stuff. We used one #10 can per 6 pounds of ground beef.
So one pound of cheese, or a 12 ounce jar or can, per pound.

Heat the cheese and ground beef together and keep warm while serving. We used my big roaster.

Serve buffet style with the chips and toppings.

This was a hit. So informal, and everyone just helped themselves.

A great day, all around.


Jan Drexler loves her family, her home, cooking and just about anything made by hand. But she loves her Lord most of all.

Stop by Jan's website to learn more about her books: www.JanDrexler.com

Monday, February 6, 2017

Retro Recipes and Wedding Food

Jan here, with a trip down wedding memory lane.


Back in 1950, when my parents were married, no one in their families thought about hiring someone to provide food for the wedding reception. The extended family, or the church, or the neighbors, or anyone who was handy, pitched in. The menu would be simple: ham sandwiches on potato rolls, jello salads, a relish plate (carrot and celery sticks, some pickles, etc.), and a tasty cake made as a wedding gift by an aunt or cousin.

Then twenty-five years later, when my brother and sister-in-law were married, I was one of the many relatives making the sandwiches and putting together a fruit salad.


I broke the tradition. My husband and I actually had our reception tea catered (of course, we hired the company my husband was working for at the time!)


Fast forward to the next generation!


The current trend, at least in our family, is to have a reception menu that reflects the bride's and groom's favorites. You can read about our June 2016 wedding here.

But we have another wedding coming up.

IN FIVE DAYS!!!!!


This reception is going to be similar to our June wedding in that the menu boasts some favorite foods, but with a totally different flair!

Again, it's in the afternoon, so no meal. Instead we'll have nachos, chips, punch and hot cider. And for the wedding cake? Jacob's favorite: cheesecake.

Since the wedding isn't until Saturday, I'll have to share the nachos recipe with you another time. But don't despair! I do have a fun recipe for you!

Katie brought this to her first Christmas Eve Tea with our family last year, and Carrie made it for a Super Bowl Party, so I'm sharing it here. Kids who grew up in the '90's love this stuff!

Dunkin' Dip

Back when my children were in the in-between stage...you know the one...it's when they're old enough to be hungry ALL. THE. TIME., and yet young enough to enjoy fun food...they loved getting Dunkaroos at the grocery store for a rare treat.

In case you need a refresher, here's a link to the product on Walmart's website: Dunkaroos

This recipe (or a few like it) have been circulating on Pinterest. Here's Carrie's version:


ingredients:
vanilla cake mix
8 oz. tub frozen whipped topping, thawed
1 cup plain greek yogurt
sprinkles

Cookies for dipping: Teddy Grahams, Graham Crackers, Vanilla Wafers, Animal Crackers...whatever you like best.

(Did I mention this recipe is super easy???)

Mix the cake mix, whipped topping, and yogurt in a bowl until blended. Stir in sprinkles (as many as you like).


Serve with your choice of dipping crackers or cookies.

Didn't I tell you that was easy?

Let's talk about wedding food - Tell us about a unique food you've seen at a wedding reception!


Jan Drexler loves her family, her home, cooking and just about anything made by hand. But she loves her Lord most of all.

Stop by Jan's website to learn more about her books: www.JanDrexler.com


Monday, January 9, 2017

Perfect Vanilla Cupcakes

It's getting close to wedding time in the Black Hills again!

On February 11, our oldest son is marrying his Katie. We had so much fun celebrating the upcoming nuptials with a shower on Saturday.


Like most of our showers, there were flowers, food, chocolate, and a LOT of visiting. We love to celebrate just about anything - especially weddings and new babies!


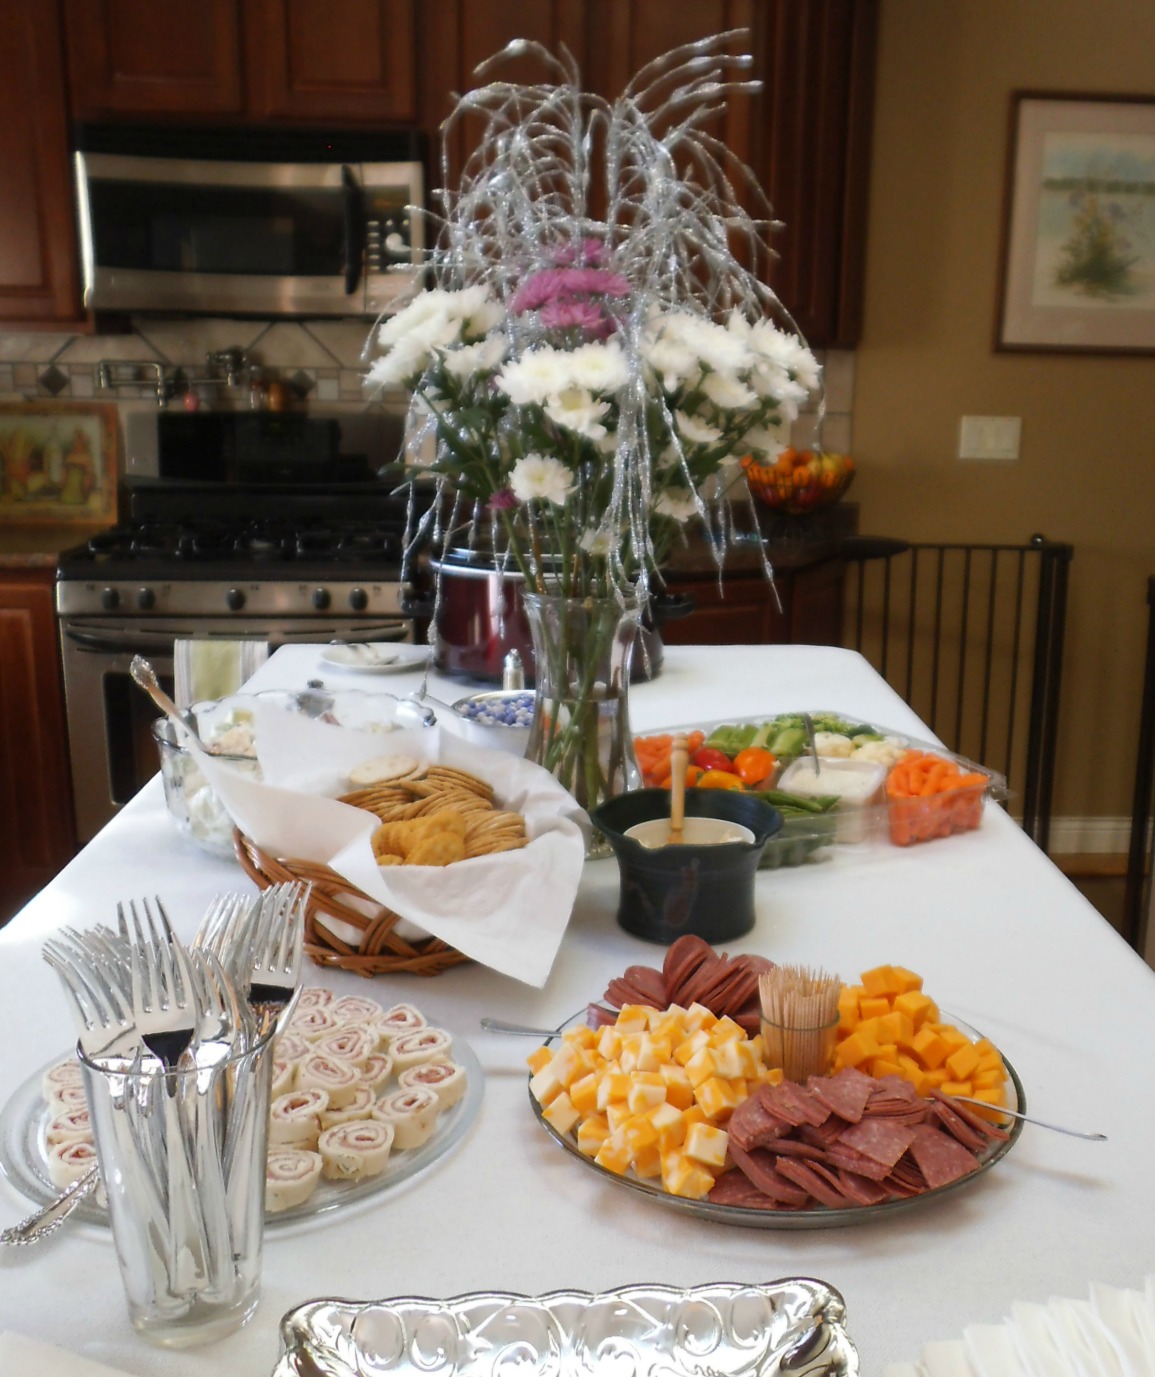
Katie's colors for the wedding are purple and silver (can you tell from the decorations?), perfect for a winter wedding.


This was an afternoon shower, so we had a variety of luncheon type snacks: cheese cubes and salami, crackers, veggies, a fruit salad, ham pinwheels (recipe here), and my famous meatballs (recipe here).


But what would a celebration be without cake??? My daughter, Carrie, made the cupcakes. She tried a new recipe for the vanilla ones, and it was fabulous! I mean, melt-in-your-mouth, save-room-for-dessert fabulous.

Of course, it's from Sally's Baking Addiction, Carrie's favorite baking blog. Be sure to check it out here!

Simply Perfect Vanilla Cupcakes

makes about 14 cupcakes

ingredients:

1 3/4 cups cake flour
3/4 teaspoon baking powder
1/4 teaspoon baking soda
1/4 teaspoon salt
1/2 cup unsalted butter, softened to room temperature
1 cup granulated sugar
3 large egg whites, at room temperature
2 teaspoons vanilla extract
1/2 cup sour cream at room temperature
1/2 cup whole milk at room temperature

Preheat the oven to 350° and line a muffin pan with cupcake liners. 

Whisk the cake flour, baking powder, baking soda, and salt together and set aside.

In a mixer, beat the butter on high speed until it's smooth and creamy - about 1 minute. Add the sugar and beat on high speed for 2 minutes. Scrape the sides of the bowl as needed. 

Add the egg whites and vanilla extract. Beat on medium-high speed until combined, then beat in the sour cream, scraping the bowl as needed.

With the mixer on low speed, add the dry ingredients. Mix only until the ingredients are mixed in.

With the mixer continuing on low speed, slowly pour in the milk until it is combined. Don't over mix the batter!

Pour the batter into 14 prepared liners, filling 2/3 full.

Bake for 19-22 minutes, or until they pass the "touch test" (lightly touch the top of one of the cupcakes - if the top springs back, it is done), or until a toothpick inserted in the center comes out clean.

Cool completely before frosting.


It might be hard to see in this picture, but the frosting was a lovely shade of lavender. Carrie made both vanilla and chocolate cupcakes. You can find the recipe for the chocolate cupcakes here.

The recipe for the frosting she used is in that same blog post, and it's called "Whipped Brown Sugar Buttercream Frosting." But to make this frosting, she substituted white sugar for the brown sugar. Neither of us thought brown sugar and purple food coloring would make a pleasing color frosting. :)


We also had a marvelous time watching Katie open her gifts, including this cross stitch picture I made for my in-laws more than twenty years ago. It has been part of our home for the last few years, and now it will have a place with a third generation of Drexlers.

Do you have any wedding or baby showers coming up in the near future? What is your favorite gift to take?


Jan Drexler loves her family, her home, cooking and just about anything made by hand. But she loves her Lord most of all.


Stop by Jan's website to learn more about her books: www.JanDrexler.com

Monday, June 20, 2016

Preserving Wedding Flowers Without Spending a Fortune

I'm still loving wedding memories! The bride was beautiful, the flowers were gorgeous, the wedding was so meaningful...


But two days later, I was cleaning up the wedding leftovers (tons of wedding leftovers!), and I saw this beautiful display in our living room:


The flowers were so lovely! A combination of blush roses, ivory roses, peonies, hydrangea, baby's breath and one cascade of orchids in the bride's bouquet.

Such beauty, and such a short lifespan. Already by Monday morning the peonies were about done.

Years ago my mother hung my bouquet from the rafter in our garage to dry it. It was lovely...and fragile. One bump from a curious dog and that bouquet was in pieces. Lots of dry, crumbly, rose petal pieces.

Yes, I cried.
1982

But then I gathered up the pieces and put them in a mason jar. I still have that jar, and love what it represents.

I wanted to do something similar for my daughter, but she married a cat-loving man. I knew that if I tried to dry the bouquet, it would suffer the same fate as mine had thirty-four years ago.

So then I thought - why not just skip a step and put it into the jar?

The first thing to do was to dry the flowers. Instead of the hot garage, I used our dehydrator. If you don't have a dehydrator, you can use an oven set to very low heat - 110° is the recommended maximum. If you leave your oven door ajar and set the temp as low as you can, you'll be okay.


I started with the rose buds. I knew they would take longer to dry, so I set them on the bottom tray. They took about 36 hours.

Then I cut branchlets off of the hydrangeas...


...and the baby's breath.


Each of these trays only took about six hours to dry.

Then I piled petals into the other trays.


I mixed the rose and peony petals together, and let them dry. They took between 8 and 10 hours. Then I'd pour them into a big bowl and fill the trays again.

We had a LOT of flowers to work with!

Instead of the mason jar I had used for my own wedding flowers, I went to Hobby Lobby and bought three sealable jars. Two small ones for the groom's mother and myself, and a large one for the happy couple.


Some of those "chalkboard" vinyl labels worked great!

So, how have you preserved memories of a special day?


Jan Drexler loves her family, her home, cooking and just about anything made by hand. But she loves her Lord most of all.

Stop by Jan's website to learn more about her books: www.JanDrexler.com.