Showing posts with label Wyoming. Show all posts

Monday, July 9, 2018

Touring the Black Hills: Devils Tower

by Jan Drexler


One of the thousands of things we love about living in the Black Hills is that we're only a hop, skip, and a jump away from Wyoming! And of all the wonderful sights in Wyoming, Devils Tower has to be the most curious.

Geologists have four theories of how the Tower was formed. All of them involved an "igneous intrusion," meaning that magma came through the earth's crust at some time, cooling in this shape, and then the surrounding area eroded away. All I know is that the place is fascinating.

Whenever we visit Devils Tower, we like to come into the National Monument area from the north, following South Dakota and Wyoming state roads rather than the interstate. I think the views are better than the main route - but only slightly. You can't beat the West for awesome landscape!


Our most recent trip to the Tower was last Wednesday, on the Fourth of July. Someone had climbed to the top of the tower - no easy feat - to display this flag for visitors. :-)


So, let's talk statistics:

It is 864 feet from the visitor center to the top of the Tower.

The top of the Tower is about 1.25 acres, or the size of a football field.

The rock that forms the Tower is phonolite prophyry, which is similar to granite but doesn't have quartz in it.

Rock climbing is allowed on the Tower, and many people do it. In 2016 there were over 6000 climbers! The first people to climb it (that we know of) were two ranchers who made the climb in 1893. The ladder they used is still visible.


But the best story about the Tower comes from Kiowa legend. According to the story, Devils Tower was formed when seven little girls were attacked by bears. When the bears chased them, the girls climbed onto a rock and prayed to it to save them. The rock began to grow upward, higher and higher, until it pushed the girls into the sky, where they became seven little stars (The Pleiades.) The bears tried to reach them, jumping on the rock and scratching the sides with their claws.

(If you're interested in learning more American Indian Legends about Devils Tower, you can purchase the booklet "First Encounters" here.


Our trip on Wednesday was to celebrate our daughter Carrie's birthday! (Don't these two look cute together?) She wanted to hike around the base of the Tower on the Red Beds Trail. This trail is 2.8 miles long, and circles the base several hundred yards out from the Tower Trail - the one-mile trail most visitors take.

This trail goes through forests and meadows and is a pleasant hike.


And it does go through the red rock beds near the Belle Fourche River.


When we reached the end of the hike, we made our way to the picnic area where we celebrated with a picnic lunch and birthday cake!


Of course, you might be familiar with this reference to the Tower, too:


Have you ever been to Devils Tower? Would you like to go?


Jan Drexler lives in the Black Hills of South Dakota with her husband and growing family. When she isn't writing, she loves hiking in the Hills or satisfying her cross stitch addiction.

You can find Jan on Facebook, Jan Drexler, author, or her website, Jan Drexler.com.


Monday, August 1, 2016

Yummy Cinnamon Swirl Banana Bread

One of the perks of having a married daughter is that she bakes in her own kitchen. :)

But that same perk has a downside. She and her new hubby stopped by for lunch yesterday and they both raved about this new banana bread recipe she had found on Sally's Baking Addiction (her favorite baking blog).

Of course we asked if there was any to share. They looked at each other and laughed.


So I asked if there was enough to take a picture so I could share the recipe with you...and this is what she sent me.


I figure if a loaf of banana bread can't last 24 hours in a house with only two people, it must be pretty good!

So I looked up the recipe. Here's the original from Sally's Baking Addiction, and here's my version:

Cinnamon Swirl Banana Bread

ingredients:

2 cups flour
3/4 teaspoon baking soda (add a little extra if your altitude is above 3000 feet)
1/4 teaspoon salt
1 teaspoon cinnamon
1/2 cup brown sugar
4 Tablespoons butter, softened
2 eggs
3 bananas, very ripe and mashed
1/3 cup sour cream (or substitute yogurt for a lower fat version)
1 teaspoon vanilla

cinnamon swirl:
1/4 cup brown sugar
1 teaspoon cinnamon
1 Tablespoon butter, softened

optional glaze:
1/2 cup powdered sugar
1 Tablespoon cream

*the glaze is optional because you won't want to wait to put the glaze on before digging in!

Preheat your oven to 350° and prepare a 9x5 loaf pan. (Spray with non-stick spray or grease with butter or oil)

Mix the cinnamon swirl: In a small bowl, combine the butter, brown sugar and cinnamon until mixed thoroughly.

Make the batter: In a medium bowl, mix together the flour, baking soda, salt and cinnamon.

With your mixer, cream the butter and brown sugar together. Add the eggs, one at a time, beating slightly after each one. Mix in the bananas, sour cream and vanilla, then slowly add the dry ingredients, mixing on low speed just until the dough is combined.

Put half of the batter in the loaf pan. Distribute the cinnamon swirl on top of the dough evenly. Top with the remaining batter.

Bake for 40-45 minutes until done. Test with a toothpick or lightly push on the top of the loaf - if it springs back, the bread is done.

Cool in the pan for 15 minutes and then turn out onto a wire rack.

If you can, wait until the loaf is completely cool before cutting it. It actually tastes better when it's cool...but if you can't wait, go ahead and dig in!


While you're enjoying your banana bread, let's take a little trip to Wyoming!

My dear husband and I celebrated our 34th anniversary with a weekend in the Big Horn Mountains.


On Saturday we went hiking in this wilderness that is so like - and yet so unlike - our Black Hills in South Dakota.


Our goal was a waterfall we had heard about, but on the way we walked through this gorgeous mountain valley.


If you were a character in a Louis L'amour novel - say, Jubal Sackett - you'd picket your horse yonder next to that pine and make camp. And you'd think long and hard about settling on this piece of land, even if you weren't a settlin' kind of man, because this Tensleep country is mighty fine.


Sigh. We didn't have any horses to picket out, and the sun was drawing toward noon, so we pressed on.

Only a quarter mile farther up the trail we found the falls.


We ate our lunch at the top of the falls and enjoyed the view.

This is my kind of waterfall - not too big, and not too small.

Flowers grow like crazy wherever sunlight can peek through
the trees!

Looking upstream.

And looking downstream.
All too soon lunch was over and it was time to head back to the trail head. This was a short hike - only three miles there and back. If we had planned more time, we could have headed on up to Mirror Lake, or even farther to the Lost Twin Lakes.

We'll definitely have to plan for a longer hike next time!


Do you have a favorite weekend get-away that you long to visit again? Tell us about it!


Jan Drexler loves her family, her home, cooking and just about anything made by hand. But she loves her Lord most of all.

Stop by Jan's website to learn more about her books: www.JanDrexler.com

Monday, August 24, 2015

Beef Jerky

I'm going to be talking westerns around here for the next couple weeks. Why? Because release day for "A Home for His Family" is only a week away!

Since I'm knee hip neck deep in Amish history and life as I work furiously to meet my September 1 deadline, I'm glad for a refreshing look at COWBOYS!

And what isn't there to like about cowboys?

Open country, horses, saddle leather, boots, hats...but what makes a real cowboy?

Here's how my heroine, Sarah MacFarland, describes a cowboy she's just met:

"Mr. Cooper’s voice was gentle, his manner courtly. He smiled as he spoke, his eyes sharp and surrounded by fine lines, as if he spent his days gazing across the prairie in the bright sunlight."


There's just something about a real cowboy. Something that makes him look natural wearing a Stetson at Sam's Club. It's the soft wear on his boots. The slim, slightly bowed legs. The lean lines of a body that can only come from hours spent in the saddle.


Confidence.


A sense that he sprang out of the prairie grass fully formed and ready to face a blizzard to save a fall calf.

The epitome of the American West.


But as much as we love cowboy lore and the romance of the western life, what makes it even better is that I know people who are really like that. 

My cowboy characters are based on real people just as much as my Amish ones are. After all, reality is so much more interesting than mythology, isn't it?

But enough waxing eloquently on one of my favorite subjects, let's get to the food!

I thought I'd share a quintessential western food - beef jerky. This has been made as long as people have been eating meat. Before freezers and refrigerators, the only way to preserve meat was to smoke it or dry it. Jerking the meat is a way to dry it with seasoning.

We love this beef jerky so much that we never buy the commercial stuff anymore...

Beef Jerky


There really isn't a recipe for this. You need meat. I use a cut called "London Broil" in some places, but you can use any lean cut of beef or chicken.

I also use this commercial seasoning kit. It comes with both the cure and the spices, so you're all set. Why mess with perfection?

And you need a bowl to mix it in (glass or stainless steel), and a glass casserole dish for the middle step.

One of these is also handy:


If you don't have a dehydrator, your oven will work well. Just set it at the lowest temperature it will go - somewhere around 170°.

First, slice the meat into 1/4" slices.


Don't worry about uneven edges or scraps, Wynter and Thatcher will take care of those for you!

Put the sliced meat in a bowl.


Four pounds of meat is all I have room for in my dehydrator, so I just keep slicing until I think it's about there. In the picture above, I'm about half-way done.


But be sure to weigh the meat after slicing it. You want to use the right amount of cure and seasoning.

I mix the cure and seasoning together in a small bowl, then sprinkle it over the meat about 1/3 at a time.


This is a dry rub process. Some people use a wet cure - basically the spices and cure are mixed with water and the meat is soaked in the marinade for 24 hours.

With the dry rub, just mix until all the slices are coated with the spice/cure mixture, Then place the slices in a glass dish.


This part is important! You want the spice/cure mixture to touch every piece of meat, so lay them out in the dish, one layer at a time, until they're all out flat. Cover the dish with plastic wrap and refrigerate for about 24 hours.


Be sure to wear your cowboy boots while you're waiting!

The next day, take all those spicy pieces of meat and lay them out on your dehydrator trays or baking sheets, if you're using your oven.


Go ahead and crowd them together, but not overlapping. The meat will shrink some during the drying process.

It takes about six hours in our semi-arid climate to dry the meat. You want it to be slightly pliable and chewy. If you let it dry too long, it turns crispy. Still tasty, but not as satisfying.


Once the jerky is dried and cooled, go ahead and enjoy it! We keep ours in the freezer for two reasons: First, just in case I misjudged something, the freezer keeps the jerky from spoiling. Second (and most important) it keeps the tasty treat out of sight.

It is so easy to take "just one more piece" when you're feeling munchy!


I'll leave you with one last look at cowboy country, this time near the Big Horn Mountains. Ah, that view makes me homesick for Wyoming!

So here's the question for today: What is your favorite part of the Cowboy culture? Don't be shy - tell us what you really think!

Monday, June 15, 2015

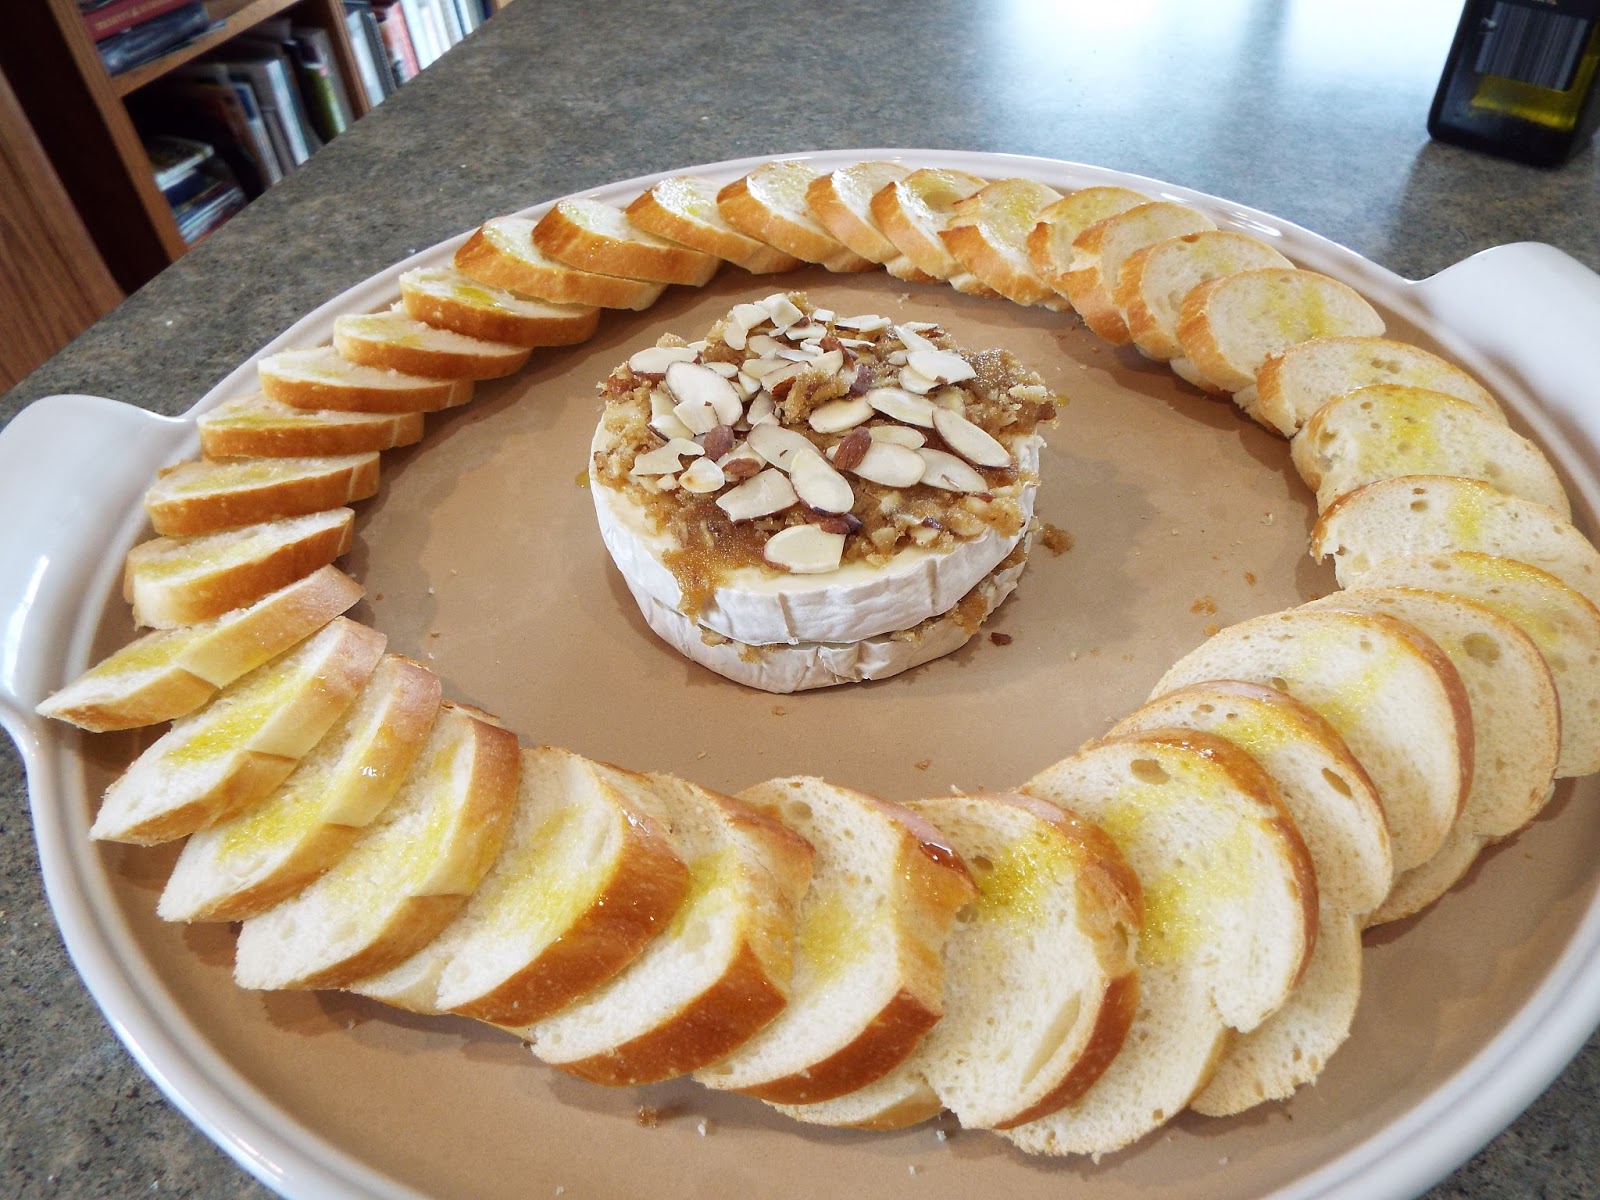
Brown Sugar-Dijon Brie

My daughter and I recently co-hosted a Pampered Chef party. If you've ever done this, you know that one of your choices as a hostess is what kind of party you'd like to have. Depending on the consultant, you can choose to do a brunch, a wedding shower, or, like Carrie and I, a wine and cheese party (or punch and cheese party, if you prefer!).

We had a great time, with babies outnumbering guests (which is always the best way to party, right?), and we all fell in love with this recipe.

Brown Sugar-Dijon Brie

ingredients:

1/3 - 1/2 cup sliced almonds
1/3 - 1/2 cup packed brown sugar
1 Tablespoon Dijon mustard
1 4-inch round (8 oz) Brie cheese with rind, at room temperature
1 loaf French baguette
Olive oil


Super, super easy instructions:

Preheat your oven to 425°.

Coarsely chop  the sliced almonds, reserving a Tablespoon or two for garnish.

Mix the chopped almonds, brown sugar and Dijon mustard in a bowl.


Cut the brie in half horizontally, then place one half of the cheese, cut side up, onto the center of a round baking stone or pizza pan. Next, top with half of the almond/sugar mixture and add the second half of the brie, cut side up.


Top this with the remaining almond/sugar mixture, and sprinkle with the reserved sliced almonds.


Don't forget the baguette! Slice the bread on a diagonal into about 24 thin slices - approximately 1/4" to 1/2" thick. Arrange the slices around the brie. Using an oil spritzer (which I don't have) or a basting brush, spray or dab the bread with olive oil.


Place your pan into the oven and bake at 425° for 8 to 10 minutes, or until the brie begins to soften and the bread slices are beginning to turn golden brown.


Once you remove the pan from the oven, let it stand for 5 minutes (I can never wait!).


On the hot baking stone, the brie continues to melt, oozing goodness all over the place! Use a knife or spreader to spread some cheese on a slice of bread and enjoy. Mmm-MMM!

For more great recipes and a browse through Pampered Chef products, you can visit our consultant's website. Her name is Nikol, and she'll be glad to have you stop by!

While you're enjoying your brie, I'll catch you up on our Black Hills weather. We went into spring with drought conditions. We had a few major fires in April, and dreaded a long, hot, dry summer with water and fire restrictions.

Not a good scenario when your area's largest industry is tourism! Who wants to go camping when your can't have a campfire?

But then we had a blizzard on Mother's Day weekend, and it's been raining off and on ever since.

My dear husband and I took a day-trip to Wyoming on Saturday. Eastern Wyoming is even more arid than this side of the Hills, but they've also been getting more than their share of rain.


I couldn't believe how green everything is!


We ran into this traffic jam just west of Sundance, but all in all, it was a wonderful drive.


When we headed east toward the Hills again, it was with a twinge of regret, because "Once you've caught the lure of it, you're homesick 'til you're back in Wyoming..."

Sourdough, part 2

And now the part you've all been waiting for - the Sourdough update.

Well, everything I read said that sourdough starter needs to be kept between 70° and 75°, but we had two unusually hot days last Monday and Tuesday, and my kitchen was hovering between 80° and 85°.

Here's what my sourdough starter looked like on day 3 (you may want to avert your eyes!):


I threw this batch out and started another one over the weekend. We're supposed to have seasonal temperatures, so I have hope!

Did any of you try the sourdough starter? How did it turn out?